.png)
Making a Picture Book (Part III)
- Dennis DeRobertis

- Jul 15, 2022
- 3 min read
How a story goes from idea to shelf at a small press publisher

Last reviewed on 07/15/2022
Part III: Working with Sketches
Working with Sketches
Part II of Making a Picture Book looked at the process of finding and hiring the perfect artist for a story. In this post, we'll look at requesting and working with page sketches and updating the shell file.
Don't Wait for Final Artwork
This might seem obvious, but you don't need to wait for final artwork before starting the process of putting a book together. In fact, if there's an iterative process between the writer and artist (and there should be), working with sketches can decrease time to market and help reveal any issues or blocks before final art is approved.
Working with sketches also gives you the ability to tighten up or change a script. There might not be major changes happening, but you might see something in the artwork that changes your approach to what you're saying or how you're saying it. Plus, reading through the entire book - text with sketches - gives you an overall feel of the flow and pacing of the story. If needed, certain adjustments can be made before final illustrations are delivered.
Picture books are a combination of words and images, after all.
In addition, adding text over sketches helps you step back and evaluate how everything looks on the page. The two need to work in concert to tell the full story. For example, perhaps a page with a single block of text flows better around the artwork if it was broken into separate chunks. Or maybe the initial position of text at the bottom of a page works better when positioned at the top.
Request and Use Sketches
Unlike other Stone Hollow Press books, Anchi chose to send a single image sketch board of all the pages for "Bus Driver! Bus Driver!" (see below). Since the book doesn't have a lot of pages or detailed backgrounds, this worked out just fine. Plus, everything arrived at once. Bonus! Regardless of how sketches arrive, make sure there's an understanding between you and the artist that this is a requirement.
(Note: A professional artist will have no issues providing sketches. If you're working with someone and they suggest otherwise, take that as a red flag. A first-pass script is never final, and the artwork shouldn't be, either. This is especially true if you're acting as the editor or funding the project out of your own pocket.)

It's an Iterative Process
After the sketch board arrived, separate screenshots were created for each spread and then imported and resized in Affinity Publisher. Pages 5 and 6, highlighted above, are used in the following example.
Step 1 - Initial page text with scene descriptions sent to <artist name>. (The entire book was sent, but we're only concentrating on pages 5 and 6 here.)

Step 2 - Initial sketches imported into our Affinity Publisher shell file.

Step 3 - Unhiding original page text to check positioning and flow.

Step 4 - Adjustments made & comments added and then sent back to Anchi.

Step 5 - The next sketch was in color and included several updates.
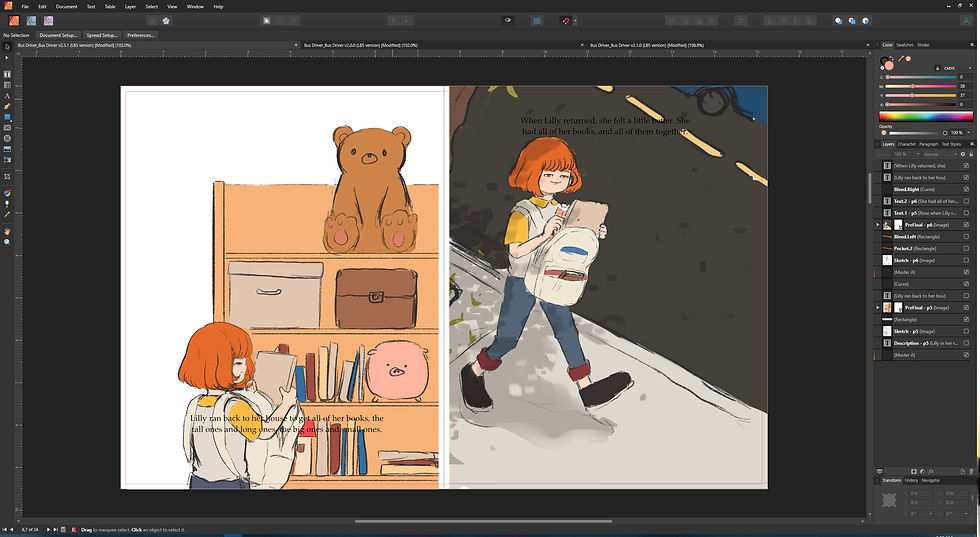
Step 6 - Repositioning and updating of text.

A couple of interesting things to note during this process.
Page 5 was initially suggested as a full-page image and page 6 as a partial-page image. The artwork dictated the best representation of the scenes, so page 5 ended up being a partial and page 6 the full.
An ask was made at Step 4 - adding additional pouches with books to the front of the backpack. The next round included the update.
The positioning of the text changed several times, depending on the artwork. A font color change was made for readability and a chunking of page 6 text into separate blocks was also made.
Rinse and Repeat
As new updates come in, the same process is followed. As the book fills in with subsequent updates, it's read again from start to end with a critical eye towards what can be changed or improved.
Conclusion
Working with sketches is a great way for a writer and artist to work collaboratively on a book. It also helps bring out the best in both parties. In Part IV of Making a Picture Book, we'll discuss updating the shell file as we await updated sketches.


Comments